One Small Favour
Start: Begin by speaking to Yanni Salika in the Shilo Village Antique Shop.
Skills: 18 Herblore, 25 Crafting, 30 Smithing, 36 Agility and the ability to defeat a level 92 enemy.
Quests: Rune Mysteries , Druidic Ritual, Shilo Village.
What You Need: 4 Steel Bars, 1 Iron Bar, 1 Bronze Bar, 5 Pigeon Cages, a Bowl of Water, Tinderbox, 1 set of logs (any type), 1 Harralander, 1 Marrentill, 2 Guam Leaves, a Chisel, Hammer, Pot, an empty Tea Cup, and about 2,000-3,000gp (esp. if you don't bring gems with you).
Recommended Skills: A high Crafting level is helpful when cutting gems.
Recommended Items: Up to 2 Cut Sapphire, 2 Cut Jade, 2 Cut Red Topaze, and 2 Cut Opal (unless you want to pay 500pg a gem to Gnormadium Avlafrim to get another if you happen to break any whilst cutting them yourself). Bring any food and armour you deem necessary, depending on your level, to fight a level 92 enemy. Teleport tabs or Magic Runes for teleporting would be very helpful. Any items or Summoning Creatures that offer running or storage advantages (Explorer Ring, Terrorbird Pouches, Bull Ants) will also be helpful.
Getting Started
To start speak with Yanni Salinka, the antique seller in Shilo village . Ask him if there is anything else to do in the village and he will say that he has a small favor to ask of you. He needs some Mahogany for an antiques from a Jungle Forester. Before you leave head to the Shilo Village Fishing store and go upstairs. Talk to Seravel to buy a Ticket for the "Lady of the Waves" ship.
To start speak with Yanni Salinka, the antique seller in Shilo village . Ask him if there is anything else to do in the village and he will say that he has a small favor to ask of you. He needs some Mahogany for an antiques from a Jungle Forester. Before you leave head to the Shilo Village Fishing store and go upstairs. Talk to Seravel to buy a Ticket for the "Lady of the Waves" ship.

The Tasks Begin
Talk to any Jungle Forester south of the village and he will say he can't give you the mahogany until you get his axe sharpened for him at the shop in Port Sarim. Bring this Blunt Axe and your Ticket to Captain Shanks,who can be found on a ship called "Lady of the Waves" west of Shilo Village. Head west past the foresters all the way to the coast to find him. The spot is marked on the map with a .
He doesn't want to help you and tells you you can take the axe yourself! If you didn't already buy a ticket in Shilo Village, buy one from him and set sail to the port. Bring the axe to Brian in the Axe Shop.
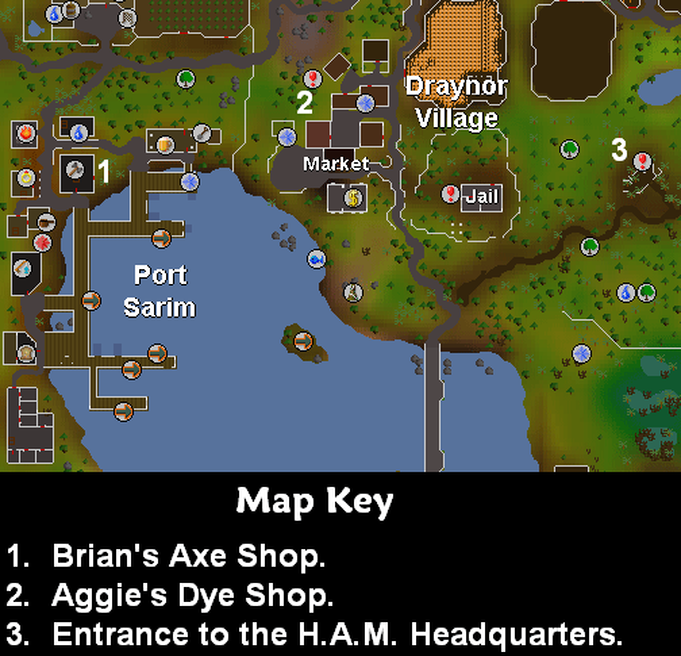
Brian won't help you because he is worried about his friend who's in trouble and threatening to run away into the wilderness to escape it. He wants you to see Aggie in Draynor Village , to have her act as a character witness for the friend! Head to Draynor Village and find Aggie's home. You might know better as the old lady that makes dyes.
Aggie is too worried about her new apprentice to help you. Jimmy the Chisel went to Lumbridge to get supplies and never returned. She will act as a character witness for Brian's friend only if you investigate the area and find out what happened to him. It turns out that Jimmy has been locked up in a jail cell in the H.A.M Headquarters.
The H.A.M. Headquarters can be found east of the Draynor jail and west of Lumbridge's general store. It is marked by a on the map. Right-click on the door and chose the pick lock option to open the door. In the southeast corner you will find Jimmy's jail cell. To talk to him, right-click on the door and select "Speak With Inmate". Basically, they are keeping him prisoner until he agrees to join their cult. He will tell you to try talking Johanhus Ulsbrecht into releasing him.
Johanhus is located directly north from the cell in the slightly darker colored robes. He says he will free Jimmy if you get him one month's supply of chickens from Jimmy's brother, Fred the Farmer. He can be found at the farm northwest of Lumbridge. From the entrance to the headquarters, head northeast. Farmer Fred is inside the farm house. Fred doesn't have enough chickens and will ask you to see Seth Groats, who owns a farm just east of there (over the river on the road to Varrock).
Seth will help you but he needs some Chicken Cages. He tell you to talk to Horvik, the Platemail seller in the shop northeast of Varrock Center about them. While talking he mentions a debt owed to Horvik for some previous work done and asks you to bring the man 3 Steel Bars.
Head to Varrock. This is a good time to get the 3 Steel Bars from the bank as well as a Bowl (fill it with water at any sink or fountain), Logs (any type), Tinderbox, 2 Guam, 1 Marrentill, and 1 Harralander. You will need these items in just a bit.
When you talk to Horvik, he is happy to take the bars but is too sick to do the work for Seth. He says he needs some medicine from the Apothecary before he can help you. He also tell you he needs 5 Pigeon Cages.
The Apothecary is located southwest of Varrock Square. He will give you some Herbal Tincture but drops the Breathing Salts. He has more but he doesn't have another air-tight pot to put them in. He says that Tassie the Potter in the Barbarian Village can make a new Pot Lid.
Before Tassie will help you she wants you to help her settle her loan with Hammerspike in the Dwarven Mines . She asks you to convince him to leave her alone. The mines are located to the northwest of the Barbarian Village. You will find Hammerspike if you head south and then west past the anvils as far as you can go.
After you talk to him about Tassie and ask if he was always a Gangster he will admit that he wants to be a druid. He'll say he wants you to go see Sanfew, upstairs in the Taverley Herblore Shop about becoming a druid initiate.
Speak to Sanfew and he will tell you he will consider taking Hammerspike as an initiate if you do a couple of favours for him. What a surprise! First he tells you to take the gnome pilot on White Wolf Mountain a cup of Guthix Rest Tea. Then he wants you to ask the pilot to open up a Glider pathway to the Feldip Hills so he can spread the word of Guthix to the ogres. He will give you the recipe for the tea and send you off. After you talk to him, go outside of the shop and a little bit south, there will be a Cup of Tea on a picnic bench. Drink the tea and you will have an Empty Tea Cup.
Read the recipe for the tea carefully as you will need to add the herbs in the same order given or it will not work. Fill your Bowl with water in one of the town's fountains if you haven't filled it yet. Start a Fire with your Tinderbox and Logs, and use the Bowl of Water on the Fire to heat it up. Use it on your Empty Tea Cup; then add a Harralander, 2 Guam Leaves, and a Marrentill. It has now become Guthix Rest Tea. Bring it to CaptainBleemadge on White Wolf Mountain. His location is marked by a on the map.
He thanks you but, before he can help you, he needs some T.R.A.S.H. (Triple Redundant Aero Super Hawser) Ropes if he wants to make it to the Feldip Hills in record time with Sanfew. He says you can get the ropes from Arhein, the General Store manager in Catherby . Of course, Arhein has his own concerns and wants you to get a weather forecast from Phantuwti Fanstuwi Farsight in the Seers' Village before he will give you the ropes. In the house just south of the bar you will find Phantutwi. He claims to already know why you have arrived but, as is becoming distressingly familiar, he cannot help you because he is concerned about a girl who needs rescuing. He says she knows that she is in a cave to the southwest of the village and that it is no farther south than Ardougne nor farther east than the Training Grounds. He cannot get any more specific than that but there is just one cave that fits that description. You must head to the Goblin Cave just south of the Fishing Guild ! It's marked by a on the map.
Enter the cave and head north into the eastern-most room. You will see a brief cinematic that appears to show you the figure of a girl trapped in the wall. Search the Sculpture on the far eastern wall (opposite the entrance).
You will find a note in the figure's belt which appears to tell you to talk to Wizard Cromperty in East Ardougne . You might know him better as the wizard that teleports people to the Rune Essence Mines. The wizard is missing a key ingredient for the spell needed to help the poor girl get unstuck from her unsuccessful teleport. He needs Iron Oxide from Tindel Merchant, an antique dealer at the Port Khazard docks located to the southeast of East Ardougne. Time to do yet another favour! Before you leave Ardougne head to the bank and pick up a chisel and about 2,000-3,000 gp. Optionally you can pick up 2 Cut Sapphires, 2 Cut Jades, 2 Cut Red Topazes, and 2 Cut Opals.
Tindel Merchant will only give you the Iron Oxide if you get him a more comfortable mattress. He will hand you a Stodgy Mattress to bring to Rantz, who is southeast of Gu'-Tanoth near the coast at the start point for the Big Chompy Bird Hunt Quest. His location is marked by a on the map.
Rantz isn't interested in helping you because he is being bugged by all the noise from a Gnome Engineer who has been making a lot of noise near Gu'Tanoth which is scaring off all the "flappers". Head straight west quite a ways and talk to Gnormadium Avlafrim. His location is marked by a on the map. Help him fix the landing lights on his runway. Search the Landing Lights for the gems that make them light up. You realize that the landing strip won't work because the gems aren't cut. Use your Chisel on them. If you crush any, you'll be able to buy another from Gnormadium for 500gp each. Optionally, you can exchange the uncut gems for the cut gems already in your inventory. Either way make sure to place the correct type of cut gem back into the posts from which you removed the same type of uncut gem. Speak again to the gnome. After a brief cinematic it is time to head back to Rantz.
Finishing the Tasks
Rantz will now fill the Stodgy Mattress so that it becomes a Comfy Mattress. Bring it back to Tindel Merchant who will now give you the Iron Oxide that Wizard Comperty in East Ardgoune needs. The Wizard can now make you the Rock Animate Spell. While in town, pick up 5 Pigeon Cages from the house behind the western bank (if you haven't already).
You can put these straight into the bank and get them back out when you reach Varrock again. Now ready for a duel to the death with a level 92 enemy! Bring food and supplies appropriate for your combat level.
Head back to the Goblin cave and read the spell while near the girl. Of course, something else goes wrong. You'll misfire the spell and a level 92 Slagilith will appear!
After killing it you will receive an Adamantite ore, Uncut Ruby and Uncut Diamond for your troubles. Now you can re-cast the spell to free the girl. She promptly tells you exactly what she thinks about Wizard Comperty and his teleport system and heads back to the Seer's village.
Follow her example and again talk to Phantutwi. You will be unsurprised to hear that he still cannot give you your weather report. After questioning him thoroughly, and finally threatening him, you will learn that his weathervane is broken. Leave the house and head to the bank to pick up a Hammer, Bronze Bar, Iron Bar and Steel Bar. Re-enter the house through the western side and go up the stairs. You will find yourself in the room with a spinning wheel. Climb the ladder to the roof and head west. Examine and search the Weathervane and you will discover it is broken. Use the Hammer on the Weathervane to give it a solid blow. Now search it again and you will receive a Bronze Ornament, an Iron Crossbar, and a Steel Pole all of which need repair. This can be done on the anvils located in the building across the street to the north. Just use each piece on an anvil with the bars and Hammer in your inventory and you will repair them. Back up on Phantuwti's roof, use these parts with the Weathervane to fix it and talk to him again to get the Forecast.
Bring the Forecast to Arhein in Catherby, who is now as satisfied as he can be with such a vague report. He will tell you that he has had the T.R.A.S.H. ropes delivered to the gnome pilot. Before you leave Catherby either buy a Pot from Arhein or get one from the bank. You also want to make sure you are ready to fight 3 level 49 Dwarves so pick up any gear you need for that. Head head back to Captain Bleemadge on White Wolf Mountain.
He to is satisfied and tells you that the flight path to the Feldip Hills is now open. It's time to give Sanfew in Taverley the good news. Sanfew is happy to discover you have completed the two favours he asked of you and will accept a dwarf as a druid initiate.
Head Back to Hammerspike in the Dwarven Mines. He will laugh and tell you he is going to remain a gangster and keep bothering Tassie. His gang of level 49 Dwarves will attack you.
You must kill all three of them before talking to Hammerspike again. Without his gang he isn't such a tough guy and will easily cave-in to your demands.
Exit the same way you entered and head east to Tassie in the Barbarian Village. Now free of her loan she is happy to show you how to make Pot Lids. She will give you some Soft Clay to use on the potter's wheel in the room. Choose to make an Unfired Lid and then use it on the Pottery Oven. Now use the Lid on the Pot.
Once again on the road, head back to the Apothecary in Varrock. He will fill your container with the Breathing Salts. Make sure you have the Herbal Tincture and the Pigeon Cages in your inventory as well and go talk again with Horvik at the Platemail shop. Feeling much better he will now make your cages into Chicken Cages.
Bring these cages back Seth Groats who tells you he will arrange the delivery of the chickens to the H.A.M. cult. Go back to their headquarters and talk to Johanhus again to free Jimmy.
Once Jimmy's free, talk to Aggie in Draynor Village. She tells you of the safe return of her Apprentice and agrees to appear as a character witness for Brian's friend. Head back to Port Sarim and give Brian the news. He will jokingly tell you that his friend decided to leave and was last seen in the deep Wilderness. After laughing at the look on your face he hands you the Sharpened Axe.
Take the boat back to Musa Point in Karamja , walk east to Brimhaven , and talk to Hajedy by the northern docks to get a cart ride back to Shilo Village. If you forgot to save any money for the return trip you can always pickpocket the money or kill a few thieves for the money needed. The boat costs 30gp and the cart 10gp. Bring the axe back to the Jungle Forester. He isn't very appreciative and tells you he could have done it himself in the time it took you. But, seeing the angry look on your face he gives you some Mahogany Logs to give to Yanni Salika. When you give him the logs he thanks you . . . and can't understand why your upset. It was just a small favour! Seeing you are angry he will give you a key ring to help sort and store your keys. You are not quite satisfied though and, after explaining everything you had to go through to complete that small favour he will give up another prize: 2 antique lamps.
Congratulations, quest complete!