
The Void Stares Back
Start: Speak to Captain Korasi in Falador Park.
Skills: 80 Magic, 78 Attack, 78 Strength, 71 Firemaking, 70 Construction, 70 Crafting, 70 Smithing, 55 Summoning, 10 Defense
Quests: A Void Dance
Items: Hammer, Tinderbox, Hard leather, Limestone brick, Logs. All required items can be obtained during the quest.
Recommended Skills: Having a high combat level is recommended.
Recommended Quests:
Recommended Items: Food, armour, weapon. The usual combat gear.
Getting Started
Begin the quest by heading to Falador Park and speaking to Captain Korasi. She will complain that the White Knights' investigations is not getting anywhere and that you need to help with the investigation. She will give you a Black full helm, Black platebody and Black platelegs. All of them are bugged, which means Savant will be able to talk to you and hear everything that you hear.
Note: You might want to get some combat gear and food now, in order to save some time later. Remember you will have to wear the black armour, so adjust for that.
From there, you'll need to head to the Black Knights' Fortress, which is located on Ice Mountain, towards the northern end. As soon as you enter, you'll go into a dialog with Commander Colby, who will teleport you to the Black Knights' base within Taverley Dungeon.
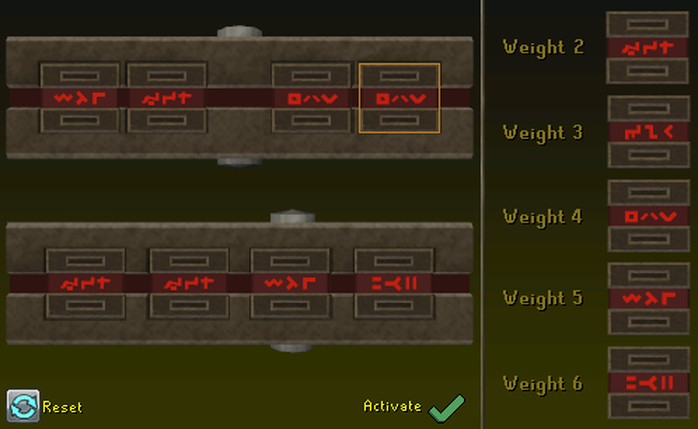
Talk to Captain Gilroy, who is beside you, and you'll be taken into a cutscene with the rest of your team. A black knight will attempt to open a door and will be killed in the process. You will then be given the task of getting through the door. Take from one of the crates and you'll discover that someone has swapped the labels on them. Talk to Captain Gilroy and he'll say he can determine the weights' differences.
Begin the quest by heading to Falador Park and speaking to Captain Korasi. She will complain that the White Knights' investigations is not getting anywhere and that you need to help with the investigation. She will give you a Black full helm, Black platebody and Black platelegs. All of them are bugged, which means Savant will be able to talk to you and hear everything that you hear.
Note: You might want to get some combat gear and food now, in order to save some time later. Remember you will have to wear the black armour, so adjust for that.
From there, you'll need to head to the Black Knights' Fortress, which is located on Ice Mountain, towards the northern end. As soon as you enter, you'll go into a dialog with Commander Colby, who will teleport you to the Black Knights' base within Taverley Dungeon.
Talk to Captain Gilroy, who is beside you, and you'll be taken into a cutscene with the rest of your team. A black knight will attempt to open a door and will be killed in the process. You will then be given the task of getting through the door. Take from one of the crates and you'll discover that someone has swapped the labels on them. Talk to Captain Gilroy and he'll say he can determine the weights' differences.
- Weight 4 should be labelled 6.
- Weight 6 should be labelled 5.
- Weight 2 should be labelled 4.
- Weight 5 should be labelled 3.
- Weight 3 should be labelled 2.
Once you've balanced the scales and the door is unlocked, head on through. Make sure you have combat gear as you're about to be ambushed by a few void pests. Captain Gilroy will fight one, the other black knight will cower away, and you'll be left to fight the remaining four: a Shifter, Brawler, Spinner and Torcher. These may deal a lot of damage, so having Protect from Melee or Deflect Melee is recommended. Attack the Spinner first, so that it won't be able to heal the other creatures.
Each time you kill a pest, it will drop a security block. Make sure you pick these up, as they're needed for the next security door. Unfortunately one was broken, so Captain Gilroy tells you to head to the mini-forge to fix it. The mini-forge is in the north west of the black knights' headquarters. It was broken in order to stop counterfeit security blocks being forged, so you're going to have to repair it with a piece of hard leather, a hammer and a limestone brick. You'll also need a tinderbox and logs to light it. The limestone brick is found by searching the crate in the same room as the forge. The logs can be found in some crates in the kitchen, which is located next to the entrance into the headquarters. The room just south of the kitchen holds crates in which you can find a hammer and a tinderbox. The hard leather can be found in a crate just outside the jail cell, which can be found east as you head into the large hall with the round table. Repair the forge, use the logs on it, and then the tinderbox to light it. After that, use the broken security block on it to fix it.
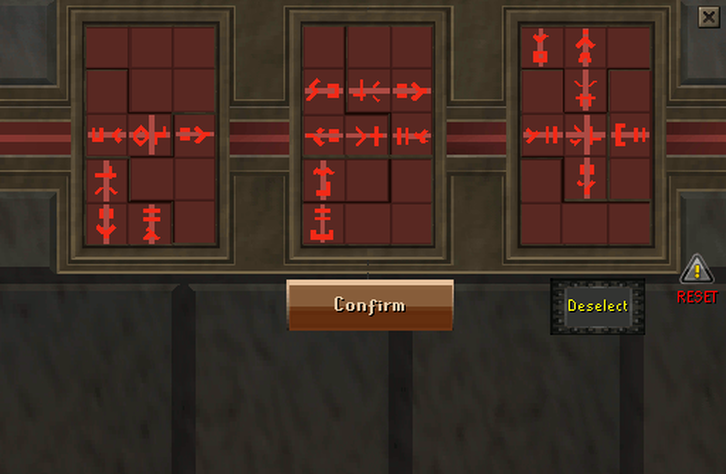
Once you've done all this, head back to the room where you were ambushed and use the security blocks on the slots in the wall that are empty. The door will unlock once you're done. Go through it and on the west wall is a panel you'll need to click. Captain Gilroy will express doubts and you'll be given an option on what to check the panel for. Choose the option to check for magical traps, and you'll disarm the trap. Click on the panels again, and you'll be confronted with another puzzle. The aim of this puzzle is to form a horizontal line spanning all of the three panels. The puzzle will not complete until every block is placed, including the ones that are not needed. The completed puzzle is below:
Each time you kill a pest, it will drop a security block. Make sure you pick these up, as they're needed for the next security door. Unfortunately one was broken, so Captain Gilroy tells you to head to the mini-forge to fix it. The mini-forge is in the north west of the black knights' headquarters. It was broken in order to stop counterfeit security blocks being forged, so you're going to have to repair it with a piece of hard leather, a hammer and a limestone brick. You'll also need a tinderbox and logs to light it. The limestone brick is found by searching the crate in the same room as the forge. The logs can be found in some crates in the kitchen, which is located next to the entrance into the headquarters. The room just south of the kitchen holds crates in which you can find a hammer and a tinderbox. The hard leather can be found in a crate just outside the jail cell, which can be found east as you head into the large hall with the round table. Repair the forge, use the logs on it, and then the tinderbox to light it. After that, use the broken security block on it to fix it.
Once you've done all this, head back to the room where you were ambushed and use the security blocks on the slots in the wall that are empty. The door will unlock once you're done. Go through it and on the west wall is a panel you'll need to click. Captain Gilroy will express doubts and you'll be given an option on what to check the panel for. Choose the option to check for magical traps, and you'll disarm the trap. Click on the panels again, and you'll be confronted with another puzzle. The aim of this puzzle is to form a horizontal line spanning all of the three panels. The puzzle will not complete until every block is placed, including the ones that are not needed. The completed puzzle is below:
Once you get through the door, you'll find out that all the boxes have been stolen. Captain Gilroy summons Commander Daquarius. Daquarius wants you to remove your helm so he can know your face, as he is quite impressed by your ability to get through all the security. Choose whatever part of the dialog you want, as it is relevant when it comes to getting the reward. Once you get through all that Sir Tiffy, Jessika and Korasi will teleport to you and try reasoning with him. You eventually decide to team up and go through the portal, with a large contingent behind you. Korasi will give you her sword, before you set off.
When you arrive through the portal, you're met by Wizard Grayzag, who turns out being the culprit and behind everything. He kidnaps Jessika, summons a swarm of nests and runs off. Korasi chases after him.
You and the others manage to escape the pests into a cave, where you're then trapped. Luckily, by contacted Savant, you're able to get a squadron of Void Conquest Knights to aid you, where you then have to play a game of Conquest against the pests. Don't worry if you lose, you're allowed to try again. Each pest has different roles, just like each individual in your Conquest squadron.
Gear
Note that you can adjust your armour to suit your needs/requirements. When making adjustments, remember that you want a high Magic and Melee defence.
Note that you can adjust your inventory to suit your needs/requirements
Alternatively, you can swap the Kyatt scrolls + pouch for a better fighting for familiar, or a Unicorn Stallion. You might also want to use Recover Specials, should you have the level.
When you first enter the area in which you'll fight the Pest Queen, you'll be confronted by a cutscene. However, Grayzag presents you with a problem on which you have to decide the outcome: Sacrifice Jessika or sacrifice Korasi in order to summon the Pest Queen? You'll have to choose who. Once you've chosen, Grayzag will kill that person and summon the Pest Queen. You won't be attacked to start off with though. You can talk to Valluta, who is imprisoned near you, about how to kill the Queen, and you can talk to whoever you chose to survive.
Note: If you lost Korasi's Sword beforehand you can retrieve it off the person you chose to survive.
Once you're ready, you can head out to fight the Queen. Korasi's sword is crucial in this battle, as its spec stops the Queen from using her spec. Whenever the Queen stops attacking you and lifts her head, you have a short time to use Korasi's Sword's spec to stop the Queen. The Queen's special attack will deal upwards of 500 LP of damage to you and anyone in the vicinity, as well as heal her. This means you can't bring a weapon to use mainly for a spec, unless you bring Recover Specials along. Also, the Queen will use her spec almost as soon as you enter the battle. You'll get a warning when this happens, but it is the only time you will be warned about the spec. Pray melee when attacking the Pest Queen.
Something else of great importance to remember is that the Pest Drones that appear will heal the Pest Queen. In order to stop them, the Rangers on your side must kill them, as you cannot. To stop the Rangers from dying, you must kill any Elite Defiler that spawns, as it will attempt to kill your Rangers. When doing so, swap your prayer to Protect from Magic/Deflect Magic as you run away from the Queen. It might also be worth noting that the hardest part of the battle is the very start, if you don't know what you're doing. Once you get into a rhythm, then it's not particularly hard to kill the Queen, as long as you keep your lifepoints relatively high in case you miss a special attack.
Note: All attacks against the Pest Queen are capped at 450 LP, so ranging with Ruby Bolts (e) won't be effective.
If you die during this fight, it can be difficult to return to your gravestone in time. However, Sir Tiffy will still be sitting on his bench, in Falador Park. If you speak to him, he will teleport you directly to the room where your gravestone will be. This saves vital minutes and will ensure that you reclaim your items.
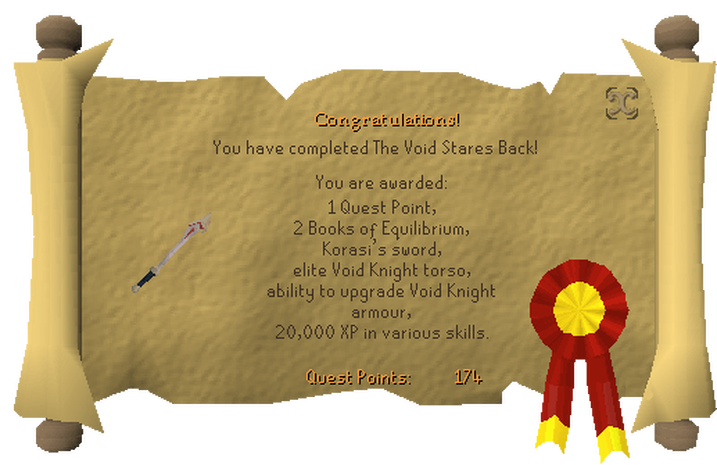
After defeating the Queen head over to Sir Tiffy and co. They have captured Grayzag and are deciding on his fate. Each person has a different view, and they end up looking to you for the final say. Once that is done, speak to Commander Tyr, who will give a rundown on the different choices you made during the questline. He'll give you an elite Void Knight Torso, of which will be a different colour based on the choices you made. Quest Complete!
When you arrive through the portal, you're met by Wizard Grayzag, who turns out being the culprit and behind everything. He kidnaps Jessika, summons a swarm of nests and runs off. Korasi chases after him.
You and the others manage to escape the pests into a cave, where you're then trapped. Luckily, by contacted Savant, you're able to get a squadron of Void Conquest Knights to aid you, where you then have to play a game of Conquest against the pests. Don't worry if you lose, you're allowed to try again. Each pest has different roles, just like each individual in your Conquest squadron.
- Splatters explode and deal 100 LP damage to any of your troops adjacent by one square.
- Ravagers have the movement of scouts, yet deal the same damage rate as a Soldier.
- Shifters can teleport distances, but don't do much damage.
- Spinners don't heal their units, yet are quite powerful; similar to your Champion.
- Defilers are the equivalent to Rangers.
- Torchers are equivalent to Mages.
Gear
Note that you can adjust your armour to suit your needs/requirements. When making adjustments, remember that you want a high Magic and Melee defence.
- Helm: Verac's Helm > Helm of Neitiznot
- Amulet: Amulet of Fury > Amulet of Glory
- Chest: Karil's Top > Black D'hide body
- Legs: Verac's Plateskirt (or any other Barrows' platelegs) > Dragon Platelegs/skirt
- Boots: Dragon Boots
- Weapon: Chaotic Weapon > Whip (Use Korasi's sword for the special)
- Shield: Dragonfire Shield > Rune Defender > God Book
Note that you can adjust your inventory to suit your needs/requirements
Alternatively, you can swap the Kyatt scrolls + pouch for a better fighting for familiar, or a Unicorn Stallion. You might also want to use Recover Specials, should you have the level.
When you first enter the area in which you'll fight the Pest Queen, you'll be confronted by a cutscene. However, Grayzag presents you with a problem on which you have to decide the outcome: Sacrifice Jessika or sacrifice Korasi in order to summon the Pest Queen? You'll have to choose who. Once you've chosen, Grayzag will kill that person and summon the Pest Queen. You won't be attacked to start off with though. You can talk to Valluta, who is imprisoned near you, about how to kill the Queen, and you can talk to whoever you chose to survive.
Note: If you lost Korasi's Sword beforehand you can retrieve it off the person you chose to survive.
Once you're ready, you can head out to fight the Queen. Korasi's sword is crucial in this battle, as its spec stops the Queen from using her spec. Whenever the Queen stops attacking you and lifts her head, you have a short time to use Korasi's Sword's spec to stop the Queen. The Queen's special attack will deal upwards of 500 LP of damage to you and anyone in the vicinity, as well as heal her. This means you can't bring a weapon to use mainly for a spec, unless you bring Recover Specials along. Also, the Queen will use her spec almost as soon as you enter the battle. You'll get a warning when this happens, but it is the only time you will be warned about the spec. Pray melee when attacking the Pest Queen.
Something else of great importance to remember is that the Pest Drones that appear will heal the Pest Queen. In order to stop them, the Rangers on your side must kill them, as you cannot. To stop the Rangers from dying, you must kill any Elite Defiler that spawns, as it will attempt to kill your Rangers. When doing so, swap your prayer to Protect from Magic/Deflect Magic as you run away from the Queen. It might also be worth noting that the hardest part of the battle is the very start, if you don't know what you're doing. Once you get into a rhythm, then it's not particularly hard to kill the Queen, as long as you keep your lifepoints relatively high in case you miss a special attack.
Note: All attacks against the Pest Queen are capped at 450 LP, so ranging with Ruby Bolts (e) won't be effective.
If you die during this fight, it can be difficult to return to your gravestone in time. However, Sir Tiffy will still be sitting on his bench, in Falador Park. If you speak to him, he will teleport you directly to the room where your gravestone will be. This saves vital minutes and will ensure that you reclaim your items.
After defeating the Queen head over to Sir Tiffy and co. They have captured Grayzag and are deciding on his fate. Each person has a different view, and they end up looking to you for the final say. Once that is done, speak to Commander Tyr, who will give a rundown on the different choices you made during the questline. He'll give you an elite Void Knight Torso, of which will be a different colour based on the choices you made. Quest Complete!
